
Today marks one year of sharing my thoughts, my recipes, my rants, my reviews. Thank you for tolerating my stream of consciousness and sporadic lags between posts.
Here's to one year and hopefully another one!
Tuesday, November 17, 2009
Tuesday, October 20, 2009
Pollan agrees with me...really!
Read the second sentence in Michael Pollan's recent New York Times article, Rules to Live By.
Go ahead. I'll wait.
Did you see that? Pollan agrees with my assertion on the stupidity of Spenda with Fiber. He even mentions me by name.
Okay, so maybe not. But still! This was one of my very first posts almost one year ago!
Go ahead. I'll wait.
Did you see that? Pollan agrees with my assertion on the stupidity of Spenda with Fiber. He even mentions me by name.
Okay, so maybe not. But still! This was one of my very first posts almost one year ago!
Wednesday, September 23, 2009
Digression
Sometimes you have to reinvent yourself, find a new beginning. Other times you need to find what is true, what is the quintessential you. Sometimes this alludes you at the deepest level.
Or maybe I'm describing the same thing. A reinvention of self. A new beginning. Beginning with the true you.
Every exit is a new opening. I read this today and it struck me to the core.
I am passionate; I love food, cooking, dance, cultures; I am open-minded; I love and give deeply; I never stop trying; I am stubborn; I am talkative; I am pensive; I love small acts of kindness; I love helping a good friend; I love sharing of myself.
I am me.
Monday, August 31, 2009
Red light, green light
And boy, did I stay on green.
Fogo de Chao, you have my heart. Brazilian steakhouse, unlimited meat, amazing salad bar. *sigh* And yes, I am well aware you don't got to a Brazilian steakhouse for the salad bar, but this one was complete with hearts of palm, sundried tomatoes, fresh mozzarella, asparagus, marinated mushrooms, etc. This was not your typical salad bar. But never fear--I had a tiny plate from the salad bar. The rest of the meal?
Meat.
And more meat. You have a coaster in front of you with one side green, the other red. The green side means: 'Bring it on. I'll have more, please!' while the red side means: 'No, thanks. I am so stuffed to the brim I cannot possibly fit more meat!' There was to be had filet mignon, parmesan encrusted pork loin, house cut of sirloin, linguica, and my favorite, the lamb chops. Oh.my.god. The lamb chops. Peppery, perfectly seasoned and spiced, moist, amazing. I had my red meat ration for the week, but it was beyond worth it.
And dessert? Papaya cream topped with cassis. Smooth, light on the palate, refreshing. Does life get much better?
Monday, June 22, 2009
Food, Inc.
A film I've greatly anticipated for quite some time now has finally arrived! The review will come after I see it...
Food, Inc. includes interviews of some of the greatest forward-thinking (or should I simply just say they use their brains?) pioneers in the local, organic, and real food movements. Interviews include the likes of my favorite, Michael Pollan, Virginia-based Polyface Farm owner Joel Salatin, and the well-known author of Fast Food Nation, Eric Schlosser.
Maybe this will spread the word and more people will finally understand the importance of scrutinizing where your food comes from. Here's hoping...
Thursday, June 18, 2009
Beauty comes to those who wait
And wait I did. For 20 hours. And then 2 more. And then 30. And then 30 more. Finally 15 more.
But you know what?
It was totally worth it. And it didn't take much effort.
Think I'm sounding contradictory? Wait until I tell you I didn't knead the bread. Not once. Not at all. I really like my everyday bread, but I've been searching for the perfect at-home artisan loaf: an airy texture, a well-developed flavor, and a shattering crispy crust. Well this is it.
But you know what?
It was totally worth it. And it didn't take much effort.
Think I'm sounding contradictory? Wait until I tell you I didn't knead the bread. Not once. Not at all.
I really like my everyday bread, but I've been searching for the perfect at-home artisan loaf: an airy texture, a well-developed flavor, and a shattering crispy crust. Well this is it.Jim Lahey's no-knead bread is truly a gem. I was skeptical, alright, but the proof is right here.
Artisan Bread
courtesy of Sullivan St. Bakery
3 cups bread flour
1 1/2 cups water
1/4 teaspoon yeast
1 1/4 teaspoon salt
olive oil (for coating)
extra flour, wheat bran, or cornmeal (for dusting)
Mix all of the dry ingredients in a medium bowl. Add water and incorporate by hand or with a wooden spoon or spatula for 30 seconds to 1 minute. Lightly coat the inside of a second medium bowl with olive oil and place the dough in the bowl. Cover the bowl with plastic wrap and let the dough rest 12-18 hours at room temperature. (I let mine rest for about 20 hours!)
Remove the dough from the bowl and fold once or twice. (See the Minimalist's review to see the picture of the fold and also to see Bittman's review.) Let the dough rest 15 minutes in the bowl or on the work surface. Next, shape the dough into a ball. Generously coat a cotton towel with flour, wheat bran, or cornmeal; place the dough seam side down on the towel and dust with flour. Cover the dough with a cotton towel and let rise 1-2 hours at room temperature, until more than doubled in size. (Wait the full 2 hours-- you've already waited this long!)
Preheat oven to 450-500 degrees F. Place the pot in the oven at least 30 minutes prior to baking to preheat. Once the dough has more than doubled in volume, remove the pot from the oven and place the dough in the pot seam side up. Cover with the lid and bake 30 minutes. Then remove the lid and bake 15-30 minutes uncovered, until the loaf is nicely browned.
Notes: My dough stuck pretty horribly to the towel, so I think next time I'm going to well flour parchment paper and place the dough in the parchment and then surround with a towel for warmth. I baked my bread in my Romertopf clay pot, which required 30 minutes of soaking beforehand. With a gas oven you also need to heat the pot slowly. Over a period of 30 minutes slowly increase the oven temperature so that the clay pot does not crack from too drastic a temperature change. And don't worry about the dough sticking to the ungreased pot. There's not a chance it will after baked.  I haven't had bread with this crispy a crust since I lived in France; a crunch that battles the strength of your jaw muscles. My bread knife was hardly suitable to crack through once it came out of the oven. (Yea yea, I couldn't wait for it to cool. So sue me...) But once you break through slightly it shatters like an airy crumb should and reveals a light, developed bread within. And the smell. Heavenly. This is a whole new realm of bread.
Wednesday, June 10, 2009
Prepare yourself for a rant...
*Updated* I forgot to add some aggravating details that are sure to make you laugh, cry, scream, etc. Update at the * below.
Okay, are you truly that gullible and, well, stupid?
Allow me to back up and explain what has me so revved up. A good friend of mine at work shares my views regarding whole, natural foods and the idiocy of constantly 'dieting' on highly-sugared 'fat-free' health food. I can't mock those irreconcilable words enough.
I'll preface by saying that the woman at work around whom this story revolves once posited she couldn't have orange juice because it had too many calories. Wha-at?! Ah yes, I once heard the tail of the woman so fat she couldn't move from her bed. The culprit? OJ.
So back to my story. This woman--let's call her Alice-- remarked that she needed to have breakfast. My friend immediately offered up the Kashi GoLean Crunch she keeps at her desk. Another offered up Special K. So Alice, being the prudent food connoisseur that she is, immediately compared the nutrition panel, not even glancing at the actual ingredients. She quickly remarked, 'OH I can't have the Kashi! It has sooo many more calories and, oh, 3 grams of fat!' My friend told her that the Kashi contains more vitamins and minerals. Alice said, 'Oh I don't care about those.' !!!!!! You are dieting and trying to eat better and you don't care about this little thing commonly referred to as nutrition?!
I hate, hate, hate how people look at the nutrition panel for health information. How does that tell you what you're actually eating? It's poor nomenclature. It should be reworded. Panel indicating the lowest caloric and fat content possible through manipulation and arrangements of ingredients that substitute for real, whole foods in order to fool you into purchasing this food and believing it to be a healthy alternative, comes to mind. It has a good ring to it, don't you think?
My friend then took both boxes to compare what really matters-- the actual ingredients. She told Alice that Kashi will have more calories and fat because it has tons of fiber and hearty ingredients to keep you full much longer. So here's where the story really gets me riled up. My friend saw the horrible ingredients in Special K, the number one culprit being high fructose corn syrup. She told Alice this and she said, and I quote, 'But you saw the commercials. It's fine in moderation.'
Breathe, Tiffany, breathe. Do you ever see commercials for oranges or tomatoes or apples claiming that they are healthy? No, no you don't because their nutrition is not questionable. You only have propaganda pushed out by Big Corn, you ignorant simpleton. And she quoted directly from the commercial!! I didn't think those commercials were effective at all because I wrongly assumed people were smart enough to see through such transparent propaganda.
*So then my friend points out that it's full of preservatives. Alice's reaction? 'What? Preservatives? Where? I don't see that listed!'
You actually think the ingredient panel will list preservatives under such name?! My friend said, 'Um, you see all of these words you don't know? Those are the preservatives...'
Shocker. Preservatives aren't listed as preservatives on the label.
And that, my friends, is how the food makers get away with making 'foodlike substances'.
Sunday, June 7, 2009
Neophilia
I love being introduced to new things. Perhaps commonplace and colloquial to others, yet new and exciting to me. The best part of taking up cooking is that there is so much to explore, so many new flavors to manipulate. Sure, you have your normal go-to supply of herbs and spices, familiar and trusted. But there's something exhilerating about trying a completely different flavor. It's with this spirit in mind that I explored the farmer's market.  Swiss chard. I have never seen such a 'pretty' green. Stalks vibrantly shaded in reds and yellows. Also another item I had been meaning to experiment with. So here goes...

I love how local and seasonal each booth is. The zucchini and squash are in. Onions of all types-- spring onion specifically caught my eye--line the tables. Locally produced honey, herbs, strawberries. Greens of all types. So many possibilities in one place.
I bought chicken the day before, so I knew I was looking for healthy vegetable side dishes. I went to see what caught my eye and what inspired me.
Fennel. I just caught Lidia Bastianich making braised fennel with onions and capers. I had never before used fresh fennel but have been meaning to for quite awhile now. It's unbelievable how truly fragrant it is when slicing into it.
Large spring onions. Ready to use, root to tip. The bulbs for the fennel dish, the tops for...
Swiss chard. I have never seen such a 'pretty' green. Stalks vibrantly shaded in reds and yellows. Also another item I had been meaning to experiment with. So here goes... Braised Fennel with Capers
Adapted from Lidia Bastianich
3 pounds fresh fennel, trimmed and cut into 1-inch chunks
2 1/2 cups sliced onions1/4 cup small capers, drained
1/2 teaspoon salt
Freshly ground black pepper
Pour olive oil into the skillet, set it over medium heat. Place in chopped fennel and onion, season with salt and stir to coat.
Cover the pan and allow the vegetables to cook and caramelize slowly, stirring occasionally. Adjust the heat as necessary so they're sizzling, softening and cooking in their own moisture, but not burning or browning too fast.
After 15 minutes, stir in the capers. If the fennel appears to be too dry or stikcing to the bottom of the pan, add a few tablespoons of water. Cook another 15 minutes, covered and stirring every few minutes. The fennel will be tender and slightly golden brown. Add more salt, if needed, and freshly cracked black pepper.
I love how simple this is. Braising, like roasting, brings out the natural sweetness of the vegetable and tones down the strong anise flavor.
Swiss Chard
Adapted from Simply Recipes
1 large bunch of fresh Swiss chard
1 small clove garlic, sliced
2 tablespoons extra virgin olive oil
2 tablespoons balsamic vinegar
Tops of 3 spring onions, chopped
2 tablespoons water
Crushed red pepper flakes, to taste
Salt
Rinse the Swiss chard leaves and remove the toughest third of the stalk. Chop the leaves into inch-wide strips.
Heat a saucepan on medium high, add olive oil, garlic, and red pepper flakes. Saute for a minute and then add the chopped Swiss chard. Add balsamic vinegar and stir to coat. Cover. Check after about 5 minutes. If it looks too dry, add a few tablespoons of water. Stir the leaves in the pan for more even cooking. Add chopped tops of spring onions. Cover and cook for another 5 minutes. Check for doneness and salt to taste. If desired, add a few tablespoons of butter at the end.
This is how I like to eat best. This is how food is meant to be enjoyed. Sure, I love a pizza (especially homemade) every now and then, but local ingredients with clean flavors is what I enjoy best.
Saturday, May 23, 2009
Scones 2 ways
 Looks good, right? ...Let's examine the road to getting to the above product. The chocolate scones will come later; for now....strawberry!
It's apparently National Strawberry Month and my work hosted a Strawberry Feast where employees brought strawberry dishes of their choosing to share. Okay, sounds great at first. As I've mentioned before, I don't bake. Or, at least I try, but cooking is more my thing. Cooking allows you to express your creativity and taste and add and get enlightened and add another key ingredient that changes the whole flavor. Baking is exact. 1 tablespoon of this. 2 cups of that. I'm not knowledgeable enough to tamper with baked goods recipes. So I feel really boxed in.
So back to Strawberry Feast. I just wasn't going to participate. You want a savory dish? Sure, no problem. But baked good?! Eh... Until I got suckered into it because no one was signing up. So they asked me to bring something since they know I'm a foodie. Sigh... now what? Strawberry mousse? Blah. Strawberry cheesecake? Too much to do on a work night. Trifle? Too common. And then I stumbled upon this. Go ahead, look. I'll wait.
Yea...you getting me now? All of a sudden I was inspired. SCONES! Of course. Not too sweet. Right up my alley. I love a semi-sweet baked good that goes with tea or coffee. (I guess I get that from my time living in France. Plus, I've never been a dessert person anyways.) Now we're talking. And it looked so simple! What could go wrong?! And this time, no cutting out butter or sugar or cream to make it healthier. Those don't seem to turn out, as history has revealed. So here we go...
Strawberry Scones
(courtesy of Confessions of a Tart)
1 cup strawberries (or other fruit)
3 tablespoons sugar (granulated)
2 cups all-purpose flour
2 teaspoons baking powder
1/4 teaspoon salt
6 tablespoons butter, in cubes, slightly softened
2/3 cup half-and-half or cream or cold buttermilk (I used half and half)
Topping:
1 tablespoon sugar
Preheat oven to 400 degrees. Lightly grease a cookie sheet.
Cut strawberries into small pieces. Sprinkle fruit with 1/2 tablespoon sugar; set aside. (I also added a 1/4 teaspoon of good Madagascar vanilla extract to the berries. You could add it or omit if you choose.) Be sure to make the pieces small, or they tend to fall out of the dough.
Combine remaining sugar with flour, baking powder and salt. Add butter, using a pastry cutter or 2 knives to cut in butter. (I used my hands to best incorporate the butter.) Stir in fruit; then add cream/half-and-half/buttermilk all at once. Use spatula to gently stir dough until it holds together.
Turn onto a lightly floured surface and knead a few times to incorporate dry ingredients. Be gentle so you don't break up the berries and don't overwork the dough. Sprinkle dough with flour if it gets sticky. (This dough is VERY sticky, so liberally use flour to pat out the dough into a circle.)
Press (pat) the dough into a circle 3/4 inch thick. If any berries peek out, push them into dough. Cut circle into 6-8 wedges, then transfer wedges to the cookie sheet, leaving at least 1/2 inch of space between them. Bake 15 minutes.
Sprinkle with sugar and bake 5-10 more minutes or until the tops are beginning to brown and spring back when you push them. (The sprinkling of sugar over the top for the last few minutes of baking creates a simple, sparkly topping.)
 Okay, you know something is going to be good when your batter smells like strawberries and cream. Really. I still remember that smell just looking at the picture!
 I made tiny, thin scones since I was trying to feed the masses at work. I made two batches of tiny, two-bite scones. They look like blobs of dough in the picture below. The dough is really sticky and I hadn't quite figured out how to cut and transfer them without ruining the shape. By the second batch I had it down. I found that if my pizza cutter worked better than a knife to cut the dough if floured well.
  Now they begin to take the typical scone shape. Well-floured dough and the pizza cutter made a HUGE difference!
 My camera was acting up on this day, so the pictures aren't very clear, but you get the picture!
 I love the sugary topping since it adds a simple sparkle to the top. Plus, scones don't have much sugar, so the added sweetness goes a long way. I'm happy to say they were a hit! I'm very particular about sharing subpar food with other people. I take it to heart if my food isn't good, so I was scared to try a new recipe for a work function. But this recipe is a keeper. Please give this a try and adapt with any fruit--or chocolate--you like!
  Now onto the second attempt with chocolate chunks! My boyfriend loves anything chocolate chunk or chip-- muffins, pancakes, bagels, etc. So since I loved the scone recipe I wanted to try it again two days later with chocolate. I tend to like things rustic, so instead of using chocolate chips, I used my go-to Lindt 70% dark chocolate and chopped it into small chunks. (I use this chocolate for my homemade hot chocolate and my chocolate molten cakes as well.)
I used half wheat flour, half all-purpose flour this time around-- so 1 cup all-purpose, 1 cup wheat. I noticed the batter was much drier once I added the 2/3 cups half and half, so I added around 1/3 cup more to the batter so it wouldn't be too dry. Since I wasn't making these for work, I made them closer to the normal scone size. After they baked I noticed they missed some pizazz on top. (I didn't add the sugar topping to this batch.) So I quickly whisked together half and half, confectioners sugar, and more Lindt chocolate over low heat. Once it thickened and cooled slightly I spooned it into a plastic sandwich bag, snipped the tip, and drizzled it over the top. Beautiful!!
Chocolate Scones
(adapted from Confessions of a Tart)
1 cup chocolate chunks
3 tablespoons sugar (granulated)
1 cup all-purpose flour
1 cup wheat flour
2 teaspoons baking powder
1/4 teaspoon salt
6 tablespoons butter, in cubes, slightly softened
1 - 1 1/3 cup half-and-half or cream or cold buttermilk (I used half and half)
 I had good natural light coming in this day, so I tried to capture it to get a better picture. I love how these look!

Saturday, May 9, 2009
A close call
I hate those times in the kitchen when it seems like nothing is working out quite right. I admittedly get pretty upset when my food just doesn't work. I love food and hate when it's a bad day in the kitchen.
So the picture below shows the pizza before it went in the oven to cook. It doesn't indicate a near disaster. In fact, it looks quite good.
 Problem 1: So-so pizza dough. I made what seemed like a promising semolina pizza dough recipe. I thought it would have a better flavor with the semolina flour. It was thin and crisp but the flavor was just... eh.
  Problem 2: Lack of proper equipment. I didn't have a pizza paddle, so creating the pizza on a cookie sheet that was too small didn't really work. I have a pizza stone, but that was coming to temperature in the oven. And the pizza was not budging from the cookie sheet. At all. A few tears in the dough later, and after smooshing it back together to fill the gaps, and several attempts to transfer later, the pizza was on the pizza stone. Phew.
 The actual toppings were good: pesto, cremini mushrooms, sliced tomato, yellow and green squash, havarti, jalapeno, grated pecorino, fresh basil. This was pizza attempt number 2; I think pizza attempt 1 turned out better. Better crust and texture, better flavor. Now that I have the pizza stone I'll keep trying for an even better crust. It's so much fun to create your own since it's so hard to get a decent pizza with good, natural ingredients.
Near and dear
Alright, this particular dish is near and dear to my heart. It's called Easter Pizza. This dates back to my great grandmother who came over from Calabria, Italy. It runs back generations and my family has made it each and every Easter, but never ever in between. It is to be made solely on Easter. It is absolutely hands down one of my favorites. And trust me-- I've been known to, ahem, beg on occasion for it to be made in between. Nope, never. Can't be done. Easter, and Easter only.
I've never in my life heard of anyone else who makes this dish--even other Italians. We've researched it and know it's a south Italian tradition, with each family having some variation: ham, salami, pepperoni, various Italian cheeses, eggs, no eggs, etc. Each version as unique as the region and the families.
Only this Easter did I run into a girl from work whose boyfriend is Italian and makes Easter pizza. Wha-at?! I was floored to say the least. Someone who knows of Easter Pizza and even knows it's called Easter Pizza?! It was so exciting for me to share such an esoteric tradition.
 Okey doke, now comes the fun part, and one you've probably been asking since the beginning of this post. Great, Tiff, but what IS Easter Pizza. Ahhh let me indulge you. (And it is quite the indulgence!)
We first start with a homemade dough for the bottom and sides. Then comes the glorious filling. Salami (genoa or hard, depending which has a better flavor at that particular time), pepperoni, diced hard boiled eggs, mozzarella, provolone, and ricotta.
BUT WAIT. 'Tiff, you always speak of healthy food and eating,' you may be asking yourself. Yes, you are correct. But, and this is a big but, I also believe it tradition. I believe in food transcending you to another place and time. Family, friends, memories.
And plus, you do only eat it once a year. ;) Moderation, my friends, moderation.
 But I digress. Back to the receipe. You mix together the salami, pepperoni, hard boiled eggs, mozzarella, and provolone. Pour the mixture over the bottom dough. Top with more mozzarella, if desired, and spread ricotta over the entire mixture.
This one is my grandmother's for the past Easter. See the thick slices of fresh mozzarella on top? Oh yes.
 The two below are my mom's version. We had two this Easter--which we've never done before-- because I begged for leftovers. =) That makes for a very happy me. Plus, some friends from work have come to know the gloriousness that is Easter Pizza and they, too, crave it! So, who was I to deny them and not bring home leftover?!
 After the ricotta is spread over the mixture, the top dough is placed on top and sealed with the bottom dough around the whole pizza. Score the top and egg wash the top of the pizza and bake in a 350 degree oven, until the crust turns a beautiful brown and the mixture bubbles.
 Look at those layers!!
 Now the one below is grandma's. I couldn't get a clean slice because of all the cheese. And that makes it even better.
  You have never ever tasted something like this. I absolutely guarantee it. I love food that brings family together.
Friday, May 8, 2009
Simple pleasures
There is nothing more simple, pure, or lovely than the smell of freshly baked bread. I'm pretty sure the smell of freshly baked bread takes anyone back to their youth. For me it reminds me of grandma's fresh bread, cooling outside the oven. I loved getting a huge slice and spreading peanut butter on the warm bread.
 I, like any other foodie, get great pleasure out of cooking a good meal. But there is something different with bread. It isn't mixing and matching ingredients to make a good meal; there's something more. It's the satisfaction you get out of actually creating something. I don't have a KitchenAid stand mixer--yet!--so the entire process is manual. Mixing, kneeding, shaping, etc. Start to finish my hands create and gently form the bread. Kneeding itself takes a good 10-15 minutes to turn a slightly crumbly mixture into a smooth, soft ball.
  I made two wheat loaves this particular night; one in a typical bread pan, the other in a cake pan because that's all I had!

 I love, love, LOVE this bread. *secret* shh.... most bread recipes call for a package of yeast. Try cutting back and only using one teaspoon. You still get 2 good rises out of the dough, plus the end result is a gorgeous dense bread. More yeast would provide an airier, lighter bread, but using less gives you a chewy dense loaf. Just look below-- no holes!
 Now I'm digging through the archives of pictures to the very first time I made bread. Man was I proud. I never EVER thought my first attempt at bread making would be successful.
 I used white bread flour the first time around. Yea, and that whole crazy idea to cool the bread after baking? Didn't happen. Nope, didn't stand a chance. I cut into that loaf so fast and smeared butter on a thick slice. Heaven, I swear.
 I, like any other foodie, get great pleasure out of cooking a good meal. But there is something different with bread. It isn't mixing and matching ingredients to make a good meal; there's something more. It's the satisfaction you get out of actually creating something. I don't have a KitchenAid stand mixer--yet!--so the entire process is manual. Mixing, kneeding, shaping, etc. Start to finish my hands create and gently form the bread. Kneeding itself takes a good 10-15 minutes to turn a slightly crumbly mixture into a smooth, soft ball.
  I made two wheat loaves this particular night; one in a typical bread pan, the other in a cake pan because that's all I had!
 I love, love, LOVE this bread. *secret* shh.... most bread recipes call for a package of yeast. Try cutting back and only using one teaspoon. You still get 2 good rises out of the dough, plus the end result is a gorgeous dense bread. More yeast would provide an airier, lighter bread, but using less gives you a chewy dense loaf. Just look below-- no holes!
 Now I'm digging through the archives of pictures to the very first time I made bread. Man was I proud. I never EVER thought my first attempt at bread making would be successful.
 I used white bread flour the first time around. Yea, and that whole crazy idea to cool the bread after baking? Didn't happen. Nope, didn't stand a chance. I cut into that loaf so fast and smeared butter on a thick slice. Heaven, I swear.
Asparagus, yes asparagus
LOOK AT THIS!!! Yes, you.
 Remember this? My love for asparagus is by no means an esoteric obsession. It is, however, an obsession. (If you need proof, just look at the header for my blog!) The last time I posted about roasted asparagus I sadly did not have my own pictures. Now I do! Just look at that poached egg with the pecorino romano melting on top! Honestly, I could eat this for dinner all the time.
 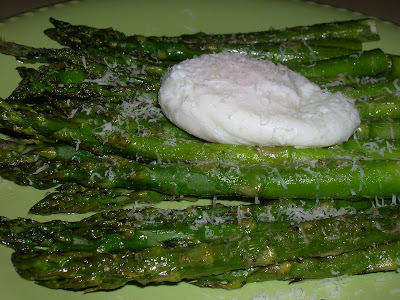 Line 'em up: the asparagus coated in extra virgin olive oil, sea salt, and pepper; ready to roast!
  Oh, and when you cut into the poached egg the still slightly-runny yolk coats the asparagus. Yes, this makes me a happy, happy girl.
Tuesday, May 5, 2009
eeeeeeeeeeee he's coming!
Only one thing would warrant a post entitled in such a way.
MICHAEL POLLAN IS COMING!!!!
Yes, the one I blogged about here and here. Oh, and to add to my jubilation, he's coming to my favorite grocery store, as blogged about here. If it's at all possible to have a foodie 'O', this is it. He's coming to the Fairfax, VA Wegmans in 2 weeks! I have tickets in hand and am giddy with excitement. A signed copy of In Defense of Food and An Omnivore's Dilemma are just 2 weeks away! Oh, what to tell him? Thank you for being vocal and standing for good, real, whole foods? You should've been Secretary of Agriculture? Your books have completely shaped my food views? Thank you for being the one person who makes sense in a throng of low-calorie, low-fat 'health' food numbnuts? So many things to say...
And you better believe I'll be posting once I meet him, so stay tuned.
Acini Chicken Caprese
 Okay, this is so a keeper. Acini Chicken Caprese. Thanks to Melissa from Alosha's Kitchen for this caprese inspired recipe. It's so simple and so flavorful. And just wait until summer when the basil is sweet and the tomatoes ripe! This will most definitely be a go-to recipe for me. You can have it hot or cold, AND it would be perfect for a summer picnic!
Acini Chicken Caprese
1 box acini di pepe
4 tomotoes, diced
Large bunch basil, chiffonade
Toasted pine nuts
Grilled chicken, diced and seasoned with olive oil, sea salt, and pepper
Extra virgin olive oil
Pecorino romano
Salt
Pepper
Zest and juice of one lemon
Directions:
Bring a large pot of water to a boil. Salt water and add acini. Cook 9 minutes or until al dente. Drain and pour acini into a large mixing bowl.
Season chicken with extra virgin olive oil, sea salt, and pepper. Grill or cook through, dice and add to pasta.
Toast pine nuts in oven or toaster oven. Add pine nuts, diced tomatoes, basil, extra virgin olive oil, salt and pepper to pasta. Add zest and juice of the lemon. Grate pecorino romano. Mix well.
My notes: I prefer De Cecco Acini di pepe. It stays al dente, even after reheating. That's what makes this a great recipe to make ahead of time. Use tons of water for the acini. It looks small but don't let it fool you! It sucks up lots of water.
Do not leave while toasting the pine nuts! Let me repeat: DO NOT LEAVE! I burnt my first batch when I washed a dish. They go from white to brown to burnt within 30 seconds. Just keep a good eye on them.
 Just look at that chicken! I love, love, LOVE my cast iron stovetop grill. I swear it turns ordinary meat into something so much more flavorful.
  Okay, so I know a typical caprese calls for mozzarella. But the thing that makes this dish so amazing is the contrast in flavors and textures. It's no surprise I love a sharp pecorino, but it works well here. Mozzarella is softer and would just be mushy in the pasta. Now, I'm not saying you can't use mozzarella, especially if you don't like sharp italian cheeses, but give pecorino a try.
Pine nuts are a pricier nut, but for about $5 worth you can change the dish from ok to wow! I too fell into the debate of 'to toast or not to toast' my pine nuts. Toasting gives them an extra edge and nuttyness; it takes them from sweeter to nutty.
 I've made this recipe twice now and it was just as good, if not better. That's a testament to a recipe: If you make it again and it turns out beautifully, it's a keeper. Light, flavorful, amazing. I can eat this straight for a whole week.
Sunday, April 12, 2009
Pictures of a local favorite
Remember when I posted in January about Bourdain's DC episode? And remember that chicken from El Pollo Rico that I raved about? Well....
...behold the glory!
 That, my friend, is pure flavor. Simple and delicious.
And again. I told you: 3 choices. Chicken (white or dark, quarter, half, or whole), french fries, coleslaw. I usually hate restaurant coleslaw but theirs is good. And the fries are crisp on the outside and soft on the inside. SO good.
And remember those dips? Bottom right: green jalepeno. Bottom left: creamy tangy sauce. Top: the two mixed together. Sigh. Life doesn't get much better than this.
...behold the glory!
 That, my friend, is pure flavor. Simple and delicious.
And again.
 I told you: 3 choices. Chicken (white or dark, quarter, half, or whole), french fries, coleslaw. I usually hate restaurant coleslaw but theirs is good. And the fries are crisp on the outside and soft on the inside. SO good.
And remember those dips? Bottom right: green jalepeno. Bottom left: creamy tangy sauce. Top: the two mixed together. Sigh. Life doesn't get much better than this.

Saturday, April 11, 2009
Valentine's Day Dinner
...2 months later! But it was so delicious I had to still mention it! Sea bass en papillote, white wine cream reduction, lyonnais potatoes, and chocolate molten cake! But the best part was that I didn't have to cook the sea bass. It was my boyfriend's gift to me since I'm the one always doing the cooking. (Funny how I still get suckered into doing the potatoes and chocolate molten cake, though ;)
 The sea bass en papillote was perfect for my boyfriend to do. It's so simple I intend to use this technique for other fish and poultry. Cut an oversized portion of parchment for each sea bass. Place the sea bass on the parchment and rub generously with olive oil, sea salt, fresh black pepper, a whole rosemary sprig, a pinch of red pepper flakes, and lemon slices. Fold the parchment over the fillet, leaving room for it to steam. If I recall, we cooked it at 350 for around 12 minutes. Sea bass has a high fat content, so it's more difficult to dry it out. Thus why it's perfect for a beginner!
 And remember that wonderful wine I posted about when I went to Jaleo? Well I knew then it would be saved for a wonderful seafood dinner; and this was it. We used it in the white wine cream sauce and it made the biggest difference in the world! I was so proud of my boyfriend because we didn't follow a recipe for the sauce and he spotted what was missing and added it! Butter, shallots, sea salt, freshly cracked black pepper, white wine, sauteed creminis, rosemary (the missing ingredient), and a touch of cream. Perfect.
 Lyonnais potatoes are another simple go-to for me for a quick side dish. Pre-cook your potatoes (I used red skinned and left the skins on) in boiling water until a fork can easily puncture the potato to the center. Drain and remove from the pan. You can either slice them or chop; it's your choice. In another pan heat a generous portion of butter and shallots. Add potatoes and coat. Sea salt, black pepper, and chopped fresh parsley. That's all it takes!
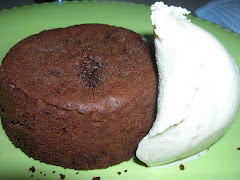
 Now onto dessert!!! I LOVE this recipe. Let me caution you: It is decadent and rich! A small amount goes a LONG way. I have yet to be able to eat my entire portion.
 Just look at that center!
 As I've stated before, I am not a baker. I've made this recipe twice and each time has turned out beautifully. The great thing is that you can make this batter the day before, portion it in ramicans, place in the fridge, cover, and bake the next day. It takes slightly longer for refrigerated batter and doesn't rise as much. I prefer to make it fresh, but if you're in a pinch and need to do it the night before, don't worry. They still turn out molten and the flavor is fantastic. However you bake them, keep an eye on them and check with a toothepick to see when they're done. It's practically goof-proof. Even if you overcook and the center isn't molten, you'll still have the best, most decadent chocolate cake!
Chocolate Molten Cakes
(adapted from Epicurious)
5 ounces bittersweet chocolate, chopped (I use Lindt 70% dark)
10 tablespoons unsalted butter
3 large eggs
3 large egg yolks
1 1/2 cups powdered sugar
1/2 cup all purpose flour
1-2 teaspoons vanilla extract
1-2 teaspoons brewed coffee or instant coffee mixed with water
Vanilla Bean ice cream
Preheat oven to 450 degrees F. Butter six ramicans. Stir chocolate and butter in double boiler over low heat until melted.* Cool slightly. Whisk eggs and egg yolks in large bowl to blend. Add vanilla extract and coffee.** Whisk in sugar, then chocolate mixture and flour. Pour batter into ramicans.
Bake cakes until sides are set but center remains soft and runny, about 11 minutes or up to 14 minutes for refrigerated batter. Run a small knife or toothepick around the cakes to loosen. Turn cakes out onto places. Serve with good vanilla bean ice cream.
Notes: For extra protection against sticking, coat ramicans in butter and cocoa powder. Line bottom with buttered parchment circles. This ensures that the cakes slide out easily.
* Double boiler: In a medium saucepan bring water to a rolling boil. Place another pan on top of the saucepan, making sure that the bottom does not touch the water. Place chocolate and butter in top saucepan to melt. This is an extra precaution against burning the chocolate and butter mixture while melting.
** The original recipe doesn't call for vanilla extract and coffee. However, both intensify the flavor and depth of the chocolate. Otherwise you risk your cake tasting like a melted chocolate bar.
This is a great recipe! The whole dinner was fantastic and was perfected with the delicious Spanish wine. Happy (belated) Valentine's Day to all!
 The sea bass en papillote was perfect for my boyfriend to do. It's so simple I intend to use this technique for other fish and poultry. Cut an oversized portion of parchment for each sea bass. Place the sea bass on the parchment and rub generously with olive oil, sea salt, fresh black pepper, a whole rosemary sprig, a pinch of red pepper flakes, and lemon slices. Fold the parchment over the fillet, leaving room for it to steam. If I recall, we cooked it at 350 for around 12 minutes. Sea bass has a high fat content, so it's more difficult to dry it out. Thus why it's perfect for a beginner!
 And remember that wonderful wine I posted about when I went to Jaleo? Well I knew then it would be saved for a wonderful seafood dinner; and this was it. We used it in the white wine cream sauce and it made the biggest difference in the world! I was so proud of my boyfriend because we didn't follow a recipe for the sauce and he spotted what was missing and added it! Butter, shallots, sea salt, freshly cracked black pepper, white wine, sauteed creminis, rosemary (the missing ingredient), and a touch of cream. Perfect.
 Lyonnais potatoes are another simple go-to for me for a quick side dish. Pre-cook your potatoes (I used red skinned and left the skins on) in boiling water until a fork can easily puncture the potato to the center. Drain and remove from the pan. You can either slice them or chop; it's your choice. In another pan heat a generous portion of butter and shallots. Add potatoes and coat. Sea salt, black pepper, and chopped fresh parsley. That's all it takes!
 Now onto dessert!!! I LOVE this recipe. Let me caution you: It is decadent and rich! A small amount goes a LONG way. I have yet to be able to eat my entire portion.
 Just look at that center!
 As I've stated before, I am not a baker. I've made this recipe twice and each time has turned out beautifully. The great thing is that you can make this batter the day before, portion it in ramicans, place in the fridge, cover, and bake the next day. It takes slightly longer for refrigerated batter and doesn't rise as much. I prefer to make it fresh, but if you're in a pinch and need to do it the night before, don't worry. They still turn out molten and the flavor is fantastic. However you bake them, keep an eye on them and check with a toothepick to see when they're done. It's practically goof-proof. Even if you overcook and the center isn't molten, you'll still have the best, most decadent chocolate cake!
Chocolate Molten Cakes
(adapted from Epicurious)
5 ounces bittersweet chocolate, chopped (I use Lindt 70% dark)
10 tablespoons unsalted butter
3 large eggs
3 large egg yolks
1 1/2 cups powdered sugar
1/2 cup all purpose flour
1-2 teaspoons vanilla extract
1-2 teaspoons brewed coffee or instant coffee mixed with water
Vanilla Bean ice cream
Preheat oven to 450 degrees F. Butter six ramicans. Stir chocolate and butter in double boiler over low heat until melted.* Cool slightly. Whisk eggs and egg yolks in large bowl to blend. Add vanilla extract and coffee.** Whisk in sugar, then chocolate mixture and flour. Pour batter into ramicans.
Bake cakes until sides are set but center remains soft and runny, about 11 minutes or up to 14 minutes for refrigerated batter. Run a small knife or toothepick around the cakes to loosen. Turn cakes out onto places. Serve with good vanilla bean ice cream.
Notes: For extra protection against sticking, coat ramicans in butter and cocoa powder. Line bottom with buttered parchment circles. This ensures that the cakes slide out easily.
* Double boiler: In a medium saucepan bring water to a rolling boil. Place another pan on top of the saucepan, making sure that the bottom does not touch the water. Place chocolate and butter in top saucepan to melt. This is an extra precaution against burning the chocolate and butter mixture while melting.
** The original recipe doesn't call for vanilla extract and coffee. However, both intensify the flavor and depth of the chocolate. Otherwise you risk your cake tasting like a melted chocolate bar.
This is a great recipe! The whole dinner was fantastic and was perfected with the delicious Spanish wine. Happy (belated) Valentine's Day to all!
Subscribe to:
Posts (Atom)


